Friday, May 31, 2013

Goin' Bananas....


The past week, I've been going absolutely BANANAS due to the ENORMOUS amount of work I have. Supercalifragilisticexpialidocious isn't a big enough word to describe how much stuff I have to do! It is just absolutely crazy.
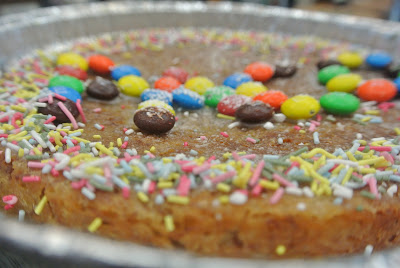
But hey, I still managed to squeeze in some time to bake since I had a birthday request. This request was EXTREMELY hard to satisfy because the person requested for no icing, and still a nice and decent-looking cake. Now I don't know about you, but I don't think a cake can really be decorated very nicely unless there's frosting. I really can't seem to make a cake look nice without some sort of icing! 
Please bear with me, the cake is quite ugly in my opinion, but HEY, as long as it makes my customer happy, it's all good.

And no, I did warn you, it's not a pretty cake.....OH WELL.

At least it was filled with banana-ey, M&M-ey, and Sprinkle-y goodness :) 
The cake itself was a VERY moist banana cake, and I think that recipe was a real winner! Even the teacher said it was great, so I guess it was good!

Of course, I had to go for the sprinkles...what more can I say?


Happy baking!

post signature

Sunday, May 26, 2013

No Oven Required: Pan-Fried Salmon on Peas

If you're looking for a baking post, this post is definitely not for you!
A while ago, I made this dish: Pan-Fried Salmon on peas. As weird as it sounds, it actually turned out REALLY well--except for the peas part, but I'll go into that later.
The salmon itself was a beautiful cut, and I was able to get a nice, crispy crust on it, but not without a few weird, unusual tricks.


At the start of it all, I planned on just pan-frying the salmon with a bit of salt and pepper, but another thought crossed my mind. What if, just what if I smeared some liquefied apricot preserves over it, then dusted it with some Panko? Now, if you're a chef yourself and are giving me weird looks right now, don't worry, nothing went wrong :)
I was debating rather or not I should do the whole preserves thing, because the salmon was a nice and somewhat expensive cut. However, I also told myself, How would you know that it'd be bad if you don't try it? So I liquefied some apricot preserves in the microwave, and before I threw the salmon into the pan, I used a pastry brush and brushed the salmon with the preserves, and I also sprinkled a teeny tiny bit of Panko over the top. After a while, a beautiful, beautiful crust formed over the top, and I smeared some more preserves over the top as it cooked. I kept doing this until the fish was done.

Aaaandd.....TADA! The fish was BEAUTIFUL, and the top was so crispy and fruity, it was so, so good. Now...onto the peas part....not gonna go into full detail, but basically it didn't turn out very good and was a little icky, so I did have to trash that. Otherwise, the fish itself was miraculously good!


Well, being the naturally big eater that I am, discarding the peas meant losing 1/4 of my lunch, so I had to try out my new Cheese and Curry flavored cup noodles with it. Unfortunately, the noodles were gross as well, so I did have to snack on Oreos later into the day!

Happy baking!

post signature

Savoury Mushroom Tarts


While I LOVE making sweet treats, sometimes I do like to look for a change in savoury treats. And although I have to admit I enjoy eating sweet treats more, savoury treats are just as fun to make!
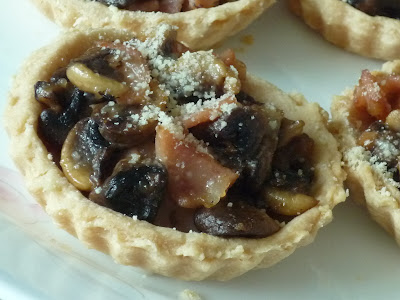
These mushroom tarts were DELICIOUS, and they were surprisingly simple! I also didn't follow a recipe for this. Everything was a product of an experiment, which I might add, a VERY successful experiment!

The tarts were just made from store bought short-crust pastry. Hey, sometimes bakers get tired of following recipes too, so a small shortcut won't hurt :) I simply rolled the pastry out and lined the small tart cases with them, then blind-baked the tarts.

For the mushroom filling, all I did was chop up some button mushrooms and gave them a quick stir in a pan with some oil, garlic, salt, and a bit of pepper I think. Then at the last minute I decided to chop up some ham and put it in too, since I'm naturally a carnivore :) Once the tarts were out of the oven, I spooned the filling into the tarts, and gave them a quick sprinkle of parmesan. I was going to pop them into the oven again, but I got SO hungry I decided just to eat them like that. And boy, were they good! These little tarts were by far THE BEST savoury treats I've made, and I can't wait to make them again this summer!


Happy baking!
post signature

Mickey Mouse Cake

If you haven't realized already, I've been posting a lot on old treats that I've been making, and that's only because I've been oh so busy recently with a gazillion tests and fairs and stuff. This post is yet another one of those oldies.

I made this cake back last year or two years ago (I forgot) for my little brother's 4th/5th birthday. The cake itself was actually quite ugly looking back, but I guess that's just because I've improved quite a bit with my baking over the past few years! Anyhow, it's always nice to look back and feel satisfied looking at how far I've come. I can't believe it's been almost 6 years since I first started baking!


The cake base was a chunky chocolate sponge. That actually tasted quite good, and the texture was superb--one of the best sponges I've made! The decorations were really just made out of melted chocolate and rice krispies treats. I simple molded the treats in a bowl, and then attached some ears with store-bought frosting!


The Mickey head was surprisingly easy to make, as all I had to do was mold, dip, and chill! The chocolate actually set really quickly, and in the end, I think it was somewhat close to the Mickey Mouse hats they sell at Disney!


I frosted the cake just in whipped cream, because unlike me, the rest of my family HATES sugary treats, which I find funny because I'm always baking treats that are loaded with sugar! I love using whipped cream to frost cakes because it's so easy to spread and gives you a nice, smooth, finish! Of course, I could've brushed up on the frosting and decorating skills, but hey, I was what, only 11/12 at the time? 

All I had to do at the end after I frosted the cake was attach the Mickey head on top, pipe my brother's name on it, and sprinkle the cake with some nonpareils! Looking back, I definitely would've made changes to a LOT of things, but hey, everything is part of a huge learning experience, and I'm thankful for all the mistakes that I've made because I can definitely learn from them!

Happy baking!

post signature

Chocolate Sprinkles Cupcakes


Now, I think I did mention in my lemon cupcakes post that I am OBSESSED with sprinkles. These little chocolate cupcakes that I made are yet another example of my sprinkles obsession. These cupcakes were SO cute, and they were a HUGE hit! I actually found a recipe and had to TRIPLE because my friend asked for 27 cupcakes, so I knew I had to deliver!! They were so, so easy to make, and it does help that the quantities can be easily tripled with simple math :)

 Definitely could've brushed up on the decorations, but hey, I had to make 36, what do you expect? :)

 Don't you just want to dig in for one???


I searched up a frosting recipe especially for these cupcakes, and that frosting recipe has now become a favorite. Since I made these cupcakes last month, I've already used the buttercream recipe thrice! That one's definitely a keeper! I'm not revealing the KILLER vanilla buttercream recipe just yet, but I will share the cupcakes recipe with you guys!

Chocolate Cupcakes

Active time: approx. 20 mins
Makes: 12 cupcakes

Ingredients:
-4 tbsp unsalted butter (no need to soften)
-1/4 cup vegetable oil
-1/2 cup water
-1 cup all-purpose flour
-1/4 cup plus 2 tbsp unsweetened cocoa powder
-3/4 tsp baking soda
-a pinch of salt
-1 egg
-1/4 cup milk
-1 tsp vanilla extract
1. Preheat the oven to 350 degrees Fahrenheit. Line a standard 12-cup muffin pan with liners.
2. In a saucepan, melt the butter with the vegetable oil and water over low heat.
3. In the bowl of an electric mixer (or just a large bowl if you don't have a stand mixer), sift the flour, sugar, cocoa, baking soda, and salt. Add the butter-oil-water mixture, and mix on low speed until smooth. 
4. Add the egg, and beat until mixed up nicely. Then, add the milk and vanilla and beat until smooth, stopping the mixer halfway to scrape the sides and bottom. 
5. Fill the cases about 3/4 full with batter.
6. Bake in the center of the oven for about 25 minutes, until they spring back when touched and a skewer inserted into the center comes out clean. Cool slightly, then transfer to a rack to cool completely. Frost and decorate. 

Happy baking!
post signature

Surrendering to the Enemy: Cake Mix Cookies


Now, now, now...I've always hated cake mix. I loved that it is easy and convenient, but I simply hated the taste. However, I do have to admit, I gave in :) And I'm more than happy that I gave in.


So Wednesday was a HUGE storm day for Hong Kong, and school obviously got cancelled. I was studying for my World War Two history test, but I got a little bored and wanted to bake. However....I didn't have much ingredients on hand, and I really shouldn't leave the house since there was a HUGE storm outside. So I looked up some easy recipes, and I came across a cake mix cookies recipe. I decided to give it a try since I had some cake mix at home and probably wouldn't use it to make a cake anyways....and guess what? The cookies turned out to be SO good, and they were really nice considering that I whipped up the batter in, what, 2 and a half minutes?

I swear I made at least 30 cookies....the ones in the pic up there's only half of what I made. I did have to adjust the recipe a bit since the amount of cake mix I used was slightly less than the ones called for in the recipe, and I pulled out a couple of extra ingredients, but otherwise, everything came out great, and I got rave reviews from friends when I was passing them out in the hallway. They were gone in a minute! Check out the recipe here! The recipe does call for chocolate chips and nuts, but meh, whatever, they came out amazing without, so I'd say just leave them out and use the chips and nuts for recipes made from scratch instead.

Happy baking!
post signature

Lemon, Pineapple, and Honey Pudding

I made these DELICIOUS little puddings back during the summer, and they were REALLY good. By really good, I mean RIDICULOUSLY good.


 Don't they just look so beautiful???


I twisted the recipe a bit, since I didn't have any lime on hand (which was what the recipe called for.) I also chopped up some pineapple and snuck a bit of those into the bottom of the ramekins who an even tropical-er effect. The recipe , which I found on the Australian Masterchef website, was SO easy to follow, and it's very forgiving, too!

Happy baking!
post signature

Andes Mints Cookies


It's actually been a LOOONNGGGG while back since I made these, but I can recall them being a big hit at camp! I made them a day before camp started back in September, and they were gone before assembly even ended! I actually don't remember where I got the recipe from, and I think I adapted it from a cookie recipe and threw in some chopped Andes mints into the dough. Well, who cares how you made it as long as it tastes good, right? :)


These cookies were REALLY big, and they were quite nice and chewy as well--Just the way I like it!

Happy baking!
post signature

Easy Peasy, Lemon Squeezy!


A while ago I made these SUPER easy lemon cupcakes, and they were definitely a hit! I didn't do so much with the decorating because I was a little short on time, but I thought they still turned out quite cute!
Before they were frosted...I still thought they were cute and couldn't resist an Instagram!


After! Aren't they just the cutest things?

You may or may not have realized that I'm just a "little" obsessed with sprinkles, but seriously, how can you say no to these cute little cupcakes! They didn't take very long, and the quantity measurements were SO accurate. I let you in on a little secret though: I actually made 11 cupcakes and not 12, because I was one cupcake liner short! For those of you who want to give it a go, you can find the recipe here.


Happy baking!
post signature

Hey there! xx

Hey there!
Quiet frankly, this is my THIRD baking blog, and hopefully this will be the one that lasts the longest! In this blog I hope to share all the stuff I've been baking, and hopefully start blogging more often again! My hope is that with a little dash of patience and a little sprinkle of love, I'll be able to share my love for baking with you!
Happy baking!